It's funny how some people will read the sentence "Brazing stainless steel is difficult and should really only be attempted after you have developed good skills at brazing normal steel." as a sound advice and will go on brazing cheap bits of tubes until they feel ready to graduate to stainless, and some other people - like Jeff - will take this as a challenge to prove whoever wrote this wrong.Turns out the guy was right :)Brazing stainless is tricky AND expensive since it can only be done with silver instead of brass.A couple of pictures down, you will be able to take a peek at Copenhagen's most expensive fork - doesn't mean you should steal it, it could still break for all we know! Only experts with a good eye trained at spotting cracks can ride this bike - the equivalent in silver of about 2 average danish women's jewelry box went into this.After a lot of sanding and buffing, that stainless fork crown truly deserves its name! The contrast between the rest of the bike painted in "defect hide mat black" and the shiny crown looks really good!One minor thing to deal with (really, JIS and ISO square tapper bottom brackets and cranks don't match??? What a surprise!!!) and this one is rolling! :D Finally! Onto mine; a bit of TIGing and the chainstays were on, a bit of cold setting - meaning you grab the offending part and push/pull on it as hard as you can - and they were level and to finish off, a lot of time spent trying my hands at fillet brazing on what I can easily refer to as "the worst place on a bike frame to try anything for the first time", i.e. the seatstays/seat tube junction. It's narrow, you can't see well or place the torch at the right angle and as always, brass rarely flows were you want it to...So it was the usual sequence: do it once, file it off, realise it's not very good, re-heat and do it all over again.

 Apart from the fact that I kinda distorted my seat tube because of heat in the process (anybody selling an oval seat post??), it does look pretty good. I would show you pictures BUT my camera is sort of broken...I knew it would happen, it was just a matter of time and of how long one can carry an unprotected SLR in a backpack also containing a pump, a multi-tool and a 15mm spanner... It's just the screen I think so might be repairable. In the mean time I've been sent back to the age of film camera: I can shoot but i have to wait until I develop - sorry download - the pictures to see what they look like. And i'm stuck at 800 iso.
 Last picture taken with a semi-broken camera.
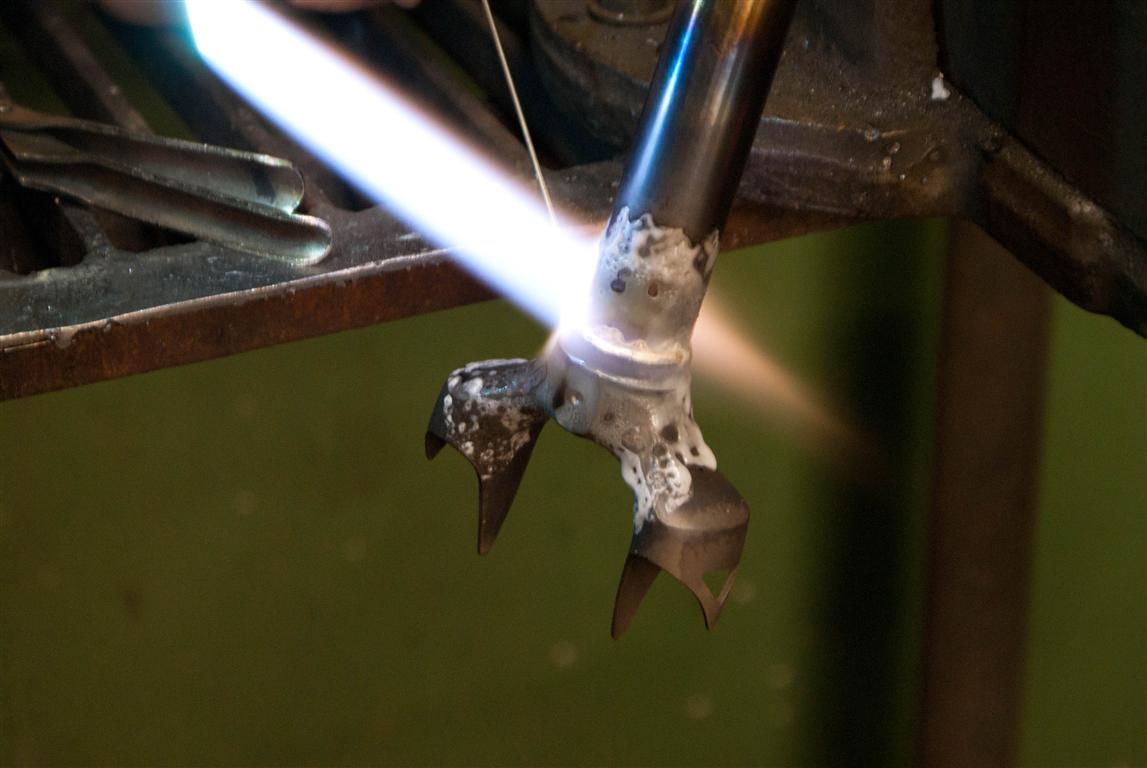
I promised you flames a while ago; it took time but we finally have them!
 We tried to fix our acetylene regulator, it seemed simple enough but nothing we tried worked... maybe the diaphragm isn't tight anymore, maybe something else... Anyways, considering our Chinese friends make new ones for peanuts (still a lot of peanuts though) we got one from a British tool supplier (we pride ourselves in being very international :) - Lower VAT is really just added bonus...). And then guess what!?! Little Denmark has its own bloody standard for some types of threads on pressure bottle valves!!! Who knew??? So pretty much back to square 1 and we sadly had to surrender, take a trip to Sanistaal and in exchange of a few hundred crowns, get an acetylene regulator approved by the queen... Some days you're just better off staying in bed!To cheer us up we could finally play with highly explosive gas and molten metal :) How fun!We had spent hours reading brazing "how to" guides and watching videos so, after carefully cracking the pressure bottles open and checking that both regulators do regulate, and that nothing that can catch fire was within about 100 feet of us, the first "pop" of the acetylene catching fire was pretty exciting!Even more exciting - but more in a "WTF just happened?" kind of way - was the first and LOUD "pop" from a flame blow out due to too much oxygen being added. Exciting because we had no idea a flame could just go off like that and mak a loud bang... Remembering his face, I'm sure Jeff (to whom this happened) squeezed his butt for a few seconds whilst holding the torch and wondering what was gonna happen next :) Luckily Googled informed us on the "because" to the "why" ("le pourquoi du comment en francais sonne mieux mais bon...) and reassured us big time!So after these few details figured out and a pile of test joints and destructive testing, I felt confident enough (maybe I shouldn't have) to braze my dropouts onto their chainstays.Suffice to say it would have been awesome having someone with experience watching over my shoulder at that point.They didn't turn out too bad but I got one dropout misaligned and the brass did not exactly flow were I wanted it to... So thanks to the tips from a bunch of guys on a forum I went for round 2, re-heated the joints, re-aligned everything and put brass were it needs to be.

 It took two days and countless hours of filling but the result is not bad for a first I think. Just have to pray they are strong enough! Only riding will tell...
Nothing to do with our bikes really but here are a couple of pictures taken in Lyon, France of a really nice old Peugeot from the mid 18-laties probably.Nice 1" pitch chainring, moustache handle bars and WOODEN rims! Carbon is so overrated!

If I have to be honest - which I don't, really but then why not... - I never thought building frames would be such a long process. In fact, I didn't really think about it and it was probably a good thing! When I came back from traveling and joined Jeff into this, he had built the jig, and we got the tubes end of January so why am I still riding a creaky fixie which bottom bracket and/or pedals might fall of at any time and Jeff his mountainbike which is just robbing him of half of the energy he puts into it with its uselessly big knobby tires and old derailleur???Sometimes it's hard to see the end of it. But slowly we are getting there! Picture below to prove it. Inui Cycles frame #1! It still needs clearing the BB threads and facing the shell and it's done! - And a nice coat of paint of course.
 And frame #2 is in the jig. The front triangle is ready for welding, dry-fit looks pretty good.
 And the rear triangle is coming along too. Unlike Jeff's frame, I will braze my dropouts instead of TIG welding them. This means a lot of filling by hand for the dropouts to fit perfectly in the stays. The result is not too bad but sometimes it's ok to blame ones tools; this needle file is S**T!!!
 We recently got hold of a second hand oxy-acetylene kit, which we were really proud to add to our growing set of tools, just to realise that the acetylene regulator was dead... Since we're cheap/poor/clever/handy, we'll fix it instead of buying a new one :) Turns out this thing is pretty much empty apart from a couple of springs and a rubber diaphragm. So we have to find a way to measure spring stiffness with what we have lying around in the shop, get a new spring, screw everything back together and you should have some nice pics of us and 20cm long flames, trying to make 2 bits of metal hold together! Stay tuned!


 Last picture taken with a semi-broken camera.


